This article will show you how to create Amazon Listing Settings within ChannelUnity. We also have a separate guide for our Amazon Competitive Repricing Tool.
This area of set up is split into three different sections, Repricing, Inventory Tools, and Listing settings.
To start, you will need to be logged into your ChannelUnity account.
First click on: Setup > Listing Settings. This should then bring you to a screen that looks like this, from here you will need to click on “Create New Listing Settings”
Using the “Please select your marketplace” drop down, select the Amazon account you wish to create the listing settings for – in this example we are creating listing settings for Amazon.co.uk. Click “Continue”:

You can enter a title for your listing settings on the next screen. For example, if you are using the listing setting to inflate your standard store price by 10% for listings on Amazon, we would recommend that you use “Amazon – 10% increase” or something similar in the title field.

Repricing
Here you can inflate or deflate your price that we are reading from the price field we have mapped (read more on our product field mapping here).
Examples of features and functions are below (for a full guide, please refer to Amazon Competitive Repricing Tool) :
To inflate the price by 10%, you simply need to input “10” in the Price Percentage Inflation field. You don’t need to put a percentage symbol (%) at the end of this.

To deflate the price by 10%, enter “-10” in the Price Percentage Inflation field. You don’t need to put a percentage symbol (%) at the end of this.

To inflate the price by a fixed amount (in this case the currency will be GBP as we are working on an Amazon UK account), enter “10” in the Price Amount Inflation field. You don’t need to put a currency symbol (£) at the start of this.

To deflate the price by a fixed amount, enter “-10” in the Price Amount Inflation field. You don’t need to put a currency symbol (£) at the start of this.

Inventory Tools
The Inventory Tools section allows you to “mask” the quantity you send to Amazon.
Maximum Quantity to Advertise – Will advertise this number of items in stock, until the number is reached, then it will begin to reflect the true amount again. For example, if this value is set to 5, but you have 10 in stock in your store, we will update Amazon with the stock level of 5, until your actual quantity is 4, then we will show the availability as 4, then 3 and so on until the item has sold out.
5, and you have 10 in stock in your store, we will will continue to list and sell through as usual until your stock reaches 4, and then the item will then no longer list on Amazon.
Projected Stock Level – Will advertise this number as in stock when your level reaches zero. For example if you set this value to 5, but you have 10 in stock on your store, once those 10 true value stock items have sold out, we will continue sell 5 more.

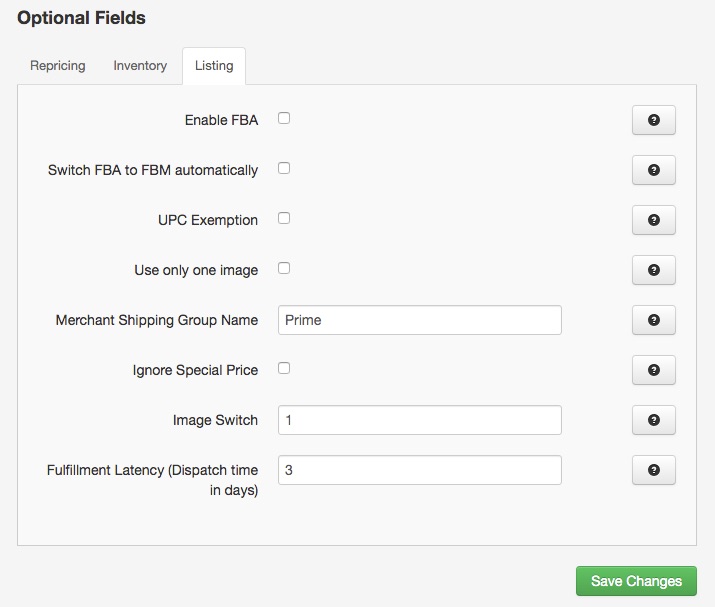
Listing Settings
Enable FBA – Tick if the products are fulfilled by Amazon.
Switch FBA to FBM automatically – Switches from FBA to FBM (fulfilled by merchant) once FBA items are out of stock.
UPC Exemption – Tick if you are exempt from providing barcodes.
Use only one image – Use only your first image for Amazon listings. This is useful if your additional images are watermarked or otherwise unsuitable for Amazon.
Merchant Shipping Group Name – Enter the name of the Amazon shipping template you’d like to use.
Ignore Special Price – Tick this if you don’t want to use your special prices on Amazon.
Image Switch – Swaps the main image with the image from the given position (1=first image).
Fulfillment Latency (Dispatch time in day) – Enter the number of days it takes to fulfil the order.

Once you’ve completed all these settings, click the green “Save” button and apply the Listing Setting to your products.

