This article describes some useful information when using Bigcommerce with ChannelUnity.
- Custom price mapping
- Finding Bigcommerce category IDs
- Adding barcodes/UPC data
Custom price mapping
This describes how to set a different price for your marketplace listings versus your website.
By default, ChannelUnity uses the same price value as on your website for your marketplace listings. However there are many reasons why you might want to have a different price when listing on marketplaces. One reason is you may wish to add a percentage to cover marketplace fees. You may also want to add shipping costs into your marketplace prices so that you can offer free shipping on the marketplace.
This guide shows how to override the price value with a custom price for ChannelUnity. For clarity we have assumed you are using an Amazon channel, but the same instructions apply equally for other channels.
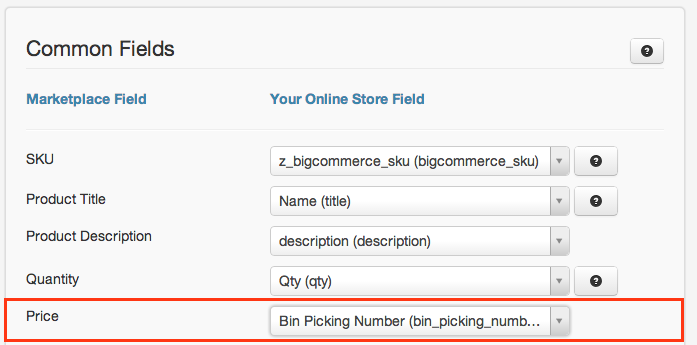
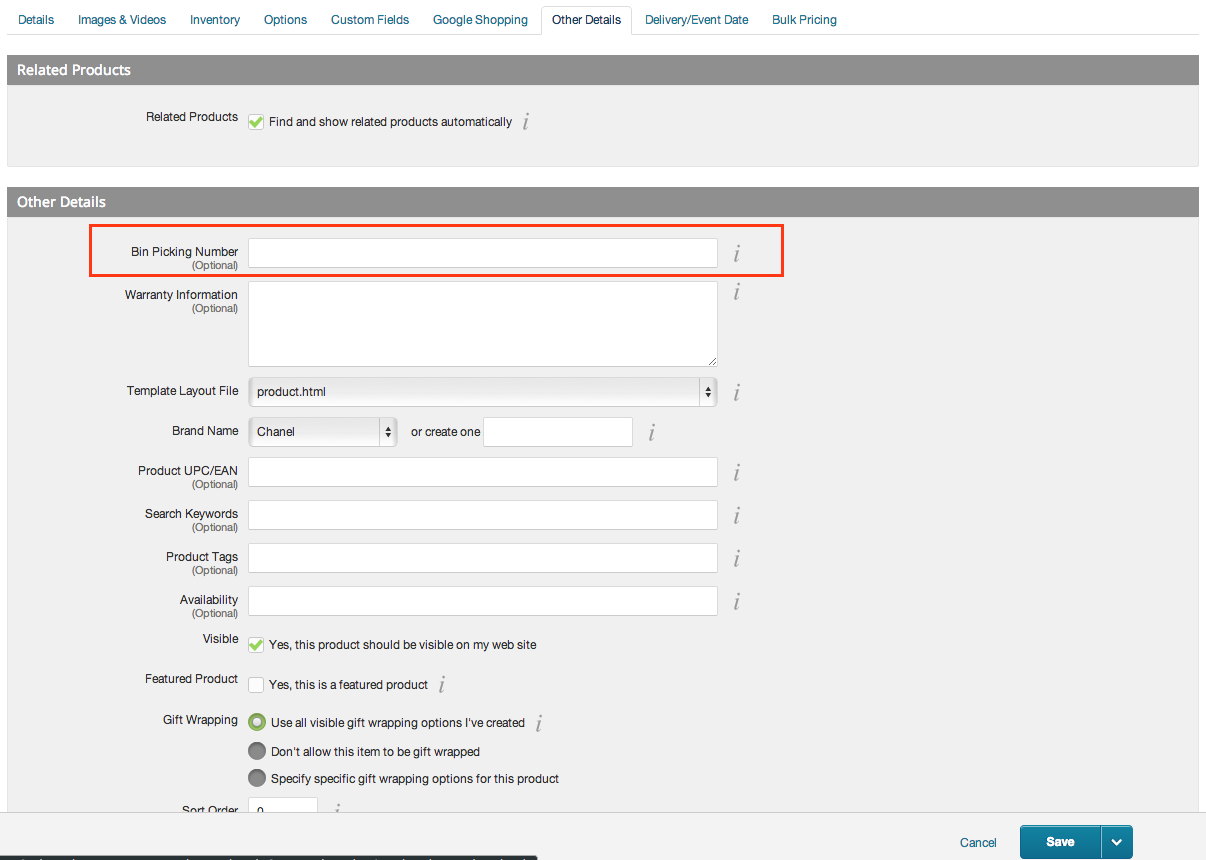
1. Identify a field in Bigcommerce (e.g. Bin picking number) which will contain the Amazon price incl. shipping.
2. Input the relevant price into the field.
3. Adjust the field mappings in ChannelUnity as follows:
4. Click Setup > Describe Product Fields.
5. In the Common Fields section, modify the field mapping for the price onto the Bin picking number field, or whatever field you are using. (this only needs to be done once). Click Save Changes. The prices will update on Amazon automatically after about 20-30 minutes.

Finding Bigcommerce category IDs
In ChannelUnity it is possible to filter products by category. This category column is the category ID of the product as imported from Bigcommerce.
This section shows you how to find the Bigcommerce Category ID field in order to use this tool correctly.
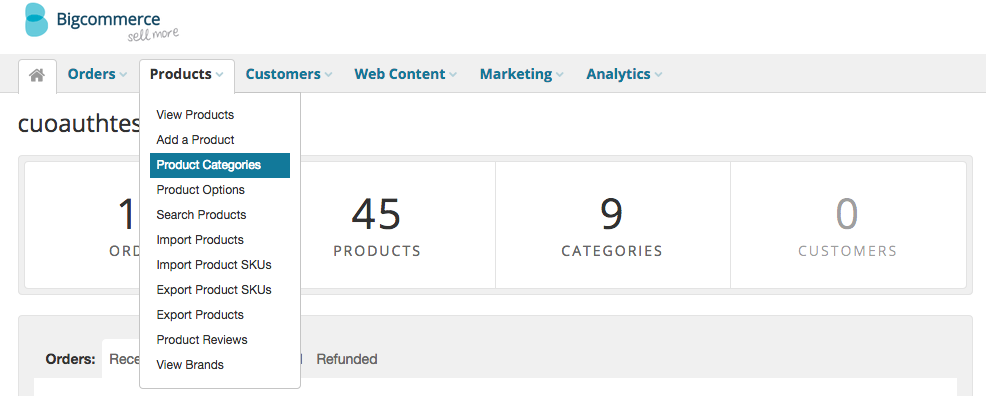
Firstly, log in to your Bigcommerce account. From here click on Products > Product Categories.

This should then bring you to a screen that looks like this.
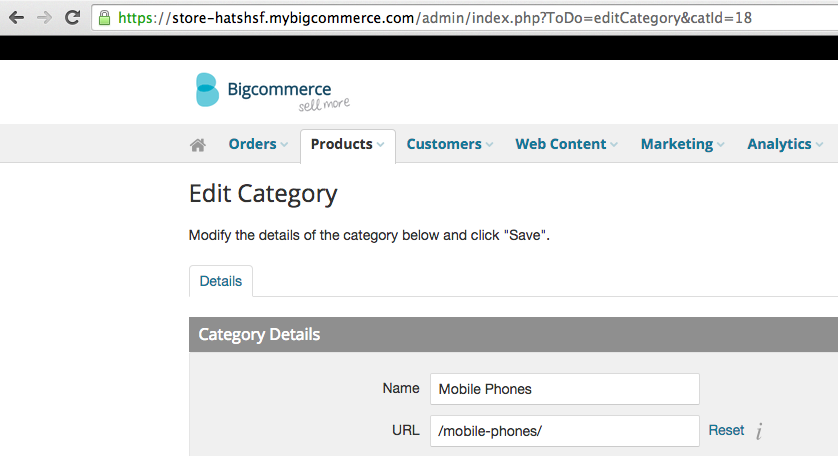
In this example, we are trying to find the category ID for our Mobile Phones, so we then click on the link of the category we are looking for.

This then brings up a screen that should look like this. At the end of the URL in the search bar, you will see, “https://store-………&catId=“. The number at the very end will be the associated Category ID (in this case 18).

You can use this number for filtering products by category in ChannelUnity.
Adding Barcodes / UPC data
This section is for the situation where you are using Bigcommerce and you have all your products in Bigcommerce already, but you now need to add your barcode/UPC values so you can list on Amazon marketplaces.
Once you have your list of barcodes, you need to follow these steps:
1. Login to the admin panel of your Bigcommerce site.
2. Click on Products -> Export Products.
3. From the available templates choose “Bulk Edit”.
4. You can leave the file format on Export to Microsoft Excel.
5. Click Continue, then click the link “Export my products to a CSV file” which appears in the pop up window.
6. Click “Download my products file”
7. Open the CSV file, Excel is probably best for this
8. You will now have an open spreadsheet with all of your products and their values and settings in Bigcommerce
9. If you look for the column “BW” it should be “Product UPC/EAN”, this is the column you are looking for
10. What you now need to do is enter into this column the matching barcode/UPC value you have been given for each of your products
11. Once you have done this, save the changes to the file
12. Return to Bigcommerce and go to Products -> Import Products
13. Tick the box which says “Bulk edit re-import”
14. Scroll down the page to the File Details section and click “Choose file”
15. Browse to the file you have saved, click Open and then Next in the bottom right hand corner of the Bigcommerce screen
16. The next screen will show you which fields it will populate from which columns in the CSV file, read through and make sure they are correct
17. Click Next, then click Start Import
18. The import process will now run and in the meantime, you can return to ChannelUnity
19. In ChannelUnity, go to Setup -> Describe Product Fields
20. Here, you need to match the Marketplace Field -> Barcode/UPC matched with the Your Online Store Field of UPC
21. Click the “Save changes” button
22. If you can now go to Setup -> Online Stores and click the green Synchronise button
23. Now when you list your items on Amazon it will pull across the UPC values you have been given for each product.

